앞전에도 썼듯이 추천시스템 중 Collaborative Filtering은 Memory-based와 Model-based로 나뉜다.
다시 한번 내용을 훑으려면,
https://simonezz.tistory.com/34
추천시스템 Recommender System 정리
코드만 짜고 하다보니 전체적인 그림이 자꾸 잊혀지는 것 같아 한 번 정리를 쭉 해보고자 한다. 참고 추천시스템이란? 사용자의 interest를 예측해서 흥미로워할 만한 상품을 추천해주는 것. 추천�
simonezz.tistory.com
나누는 기준은 parametric maching learning을 사용하는 방법은 Model-based라 할 수 있다.
즉 Gradient Descent와 같은 Optimization방법으로 parameter를 업데이트하는 방식이면
Model-based, 그렇지 않으면 Memory-based이다.
이 중 오늘은 Model-based 방법에 대해 포스팅하고자 한다.

위의 알고리즘에 관해 몇마디 해보자면,
1. Matrix Factorization(MF)
Matrix Factorization(MF)의 기본 아이디어는 "사용자의 선호도가 몇개의 hidden factors"로 결정될 수 있다는 것이다.
(이러한 factors들을 Embeddings이라 부른다.)
Matrix decompoision은 loss function과 constraints에 대한 optimization으로 여겨질 수 있다.
constraints는 모델의 특성에 따라 선택되는데 예를 들어, Non-negative matrix decomposition는 resultant matrices가 non-negative 원소들을 갖기를 원하는 경우인데, 여기서는 non-negative 조건이 constraints가 된다.

위에서 언급한 Embeddings는 아이템과 사용자의 low dimensional hidden factors라 이해하면 된다.
예를 들어 5차원의 embeddings를 갖고있다고 할 때,(즉 위에서 n_factors=5) user X와 movie A에 대해 5개의 숫자들이 5개의 다양한 특성을 보여준다고 생각할 수 있다.
movie A에 대한 5개의 숫자들은 예를들어 action, comedy, romantic에 대한 수치를 보여줄 수 있고, user X에 대한 5개의 숫자들은 얼마나 이 사용자가 sci-fi 영화를 좋아하는지, 최근영화를 얼마나 좋아하는지에 대한 수치를 보여줄 수도 있다.
위의 그림에서 볼 수 있듯이, user X와 movie A에 대한 각 5개의 숫자들의 dot product를 통해 movie A가 얼마나 user X에 맞는 추천인지를 알 수 있다.
다음섹션에서 Matrix Factorization의 예인 Orthogonal Factorization(SVD), Probabilistic Factorization(PMF) 그리고 Non-Negative Factorization(NMF)에 대해 다룰 것이다.
2. Non-parametric approach(KNN)
Non-parametric approach의 아이디어는 memory-based 추천시스템의 아이디어와 같다.
Memory-based 알고리즘에서 우리는 예측을 하기 위해, 사용자간의 또는 아이템 간의 유사성을 weights로 사용한다.
Non-parametric approach와의 차이는 메모리기반 방법에서의 유사성은 cosine, pearson유사도로 판단되는 것과 달리 Non-parametric approach에서는 unsupervised learning model을 사용한다는 것이다.
또한, Non-parametric approach는 유사한 사용자들의 수를 k와 같은 수로 한정지어 시스템을 더 확장가능하게 만든다.
3. Neural Nets / Deep Learning
아래는 neural network를 이용한 embeddings의 예이다.

위의 사진에서도 확인할 수 있듯이 neural nets을 이용하여 user latent features와 movie latent features를 업데이트해 최종 ratings를 구하는 것이 목적이다. 이로써 neural nets을 이용한 것은 matrix factorization의 확장판이라 생각할 수 있다.
SVD나 PCA에서 우리는 우리의 original sparse 행렬을 두 개의 low rank orthogonal matrix로 분리하는데, neural net에서는 꼭 나눠진 matrix가 orthogonal일 필요가 없다. 우리는 그저 embedding matrices의 값들을 업데이트하는 것에 초점을 맞춘다.
User latent features와 Movie latent features는 후의 linear, non-linear layers의 input이 된다. 이러한 input은 relu, sigmoid layers에 넣어져 optimization방법에 따른 weights를 배우게 된다.
이제 Python을 통해 구현해보자!
맨 처음 이미지에서 알 수 있듯이, Collaborative Filtering의 알고리즘들은 fastai, surprise 패키지를 통해 간단하게 구현가능하다.
-
Surprise 패키지
아래의 포스팅에서 확인할 수 있다.
https://simonezz.tistory.com/23
추천시스템 Collaborative Filtering(CF) Python 기반 [2]
모델 기반 앞선 포스팅에서는 메모리 기반의 collaborative filtering에 대해 다뤘다. https://simonezz.tistory.com/22 추천시스템 Collaborative Filtering(CF) 정리 (Python 기반) - 1 Collaborative Filtering..
simonezz.tistory.com
-
Fast.ai 패키지
fast.ai는 머신러닝이나 딥러닝을 쉽게 사용하도록 만들어진 라이브러리이다.
- Shallow Learning
아래는 fastai를 이용해 5줄의 코드로 Probabilistic matrix factorization을 구현한 것이다.
ratings = pd.read_csv('ratings_small.csv') # loading data from csv
"""
ratings_small.csv has 4 columns - userId, movieId, ratings, and timestammp
it is most generic data format for CF related data
"""

val_indx = get_cv_idxs(len(ratings))  # index for validation set
wd = 2e-4 # weight decay
n_factors = 50 # n_factors - dimension of embedding matrix (D)

# data loader
cf = CollabFilterDataset.from_csv(path, 'ratings_small.csv', 'userId', 'movieId', 'rating')

# learner initializes model object
learn = cf.get_learner(n_factors, val_indx, bs=64, opt_fn=optim.Adam)

# fitting model with 1e-2 learning rate, 2 epochs,
# (1 cycle length and 2 cycle multiple for learning rate scheduling)
learn.fit(1e-2,2, wds = wd, cycle_len=1, cycle_mult=2)
2개의 factorized 행렬들은 neural net에 embedding layer를 추가함으로써 만들어지는 embedding 행렬들이라 생각할 수 있다.(그래서 이름이 얕은 러닝이다.)
2. Deep Learning
위에서 본 shallow learning에 linear, nonlinear layers를 추가함으로써 deep neural net model을 만들 수 있다.
fast.ai를 이용하여 CF에 사용할 deep neural net을 만드는 과정은 다음과 같다.
Step 1>
fast.ai 라이브러리는 PyTorch에서 만들어졌기 때문에 data를 PyTorch data-loader로 로드한다.
여기서는 ColumnarModelData.from_data_frame을 사용하여 데이터셋을 로드했다.
x = ratings.drop([‘rating’],axis=1)
y = ratings[‘rating’].astype(np.float32)
data = ColumnarModelData.from_data_frame(path, val_indx, x, y, [‘userId’, ‘movieId’], 64)
x는 ratings에서 'rating' 항목을 없앤 dataframe으로 'userId', 'movieId', 'timestamp'에 대한 정보를 갖고있다.
y는 'rating' 항목만을 가지고 있으며 numpy형태이다.
Step 2>
custom neural net을 정의한다.
초기화하는 함수 __init__()와 input값을 넣는 forward()가 필요하다.
# nh = dimension of hidden linear layer
# p1 = dropout1
# p2 = dropout2

class EmbeddingNet(nn.Module):
    def __init__(self, n_users, _n_movies, nh = 10, p1 = 0.05, p2= 0.5):
        super().__init__()
        (self.u, self.m, self.ub, self.mb) = [get_emb(*o) for o in [
            (n_users, n_factors), (n_movies, n_factors),
            (n_users,1), (n_movies,1)
        ]]

        self.lin1 = nn.Linear(n_factors*2, nh)  # bias is True by default
        self.lin2 = nn.Linear(nh, 1)
        self.drop1 = nn.Dropout(p = p1)
        self.drop2 = nn.Dropout(p = p2)

    def forward(self, cats, conts): # forward pass i.e.  dot product of vector from movie embedding matrixx
                                    # and vector from user embeddings matrix

        # torch.cat : concatenates both embedding matrix to make more columns, same rows i.e. n_factors*2, n : rows
        # u(users) is doing lookup for indexed mentioned in users
        # users has indexes to lookup in embedding matrix.

        users,movies = cats[:,0],cats[:,1]
        u2,m2 = self.u(users) , self.m(movies)

        x = self.drop1(torch.cat([u2,m2], 1)) # drop initialized weights
        x = self.drop2(F.relu(self.lin1(x))) # drop 1st linear + nonlinear wt
        r = F.sigmoid(self.lin2(x)) * (max_rating - min_rating) + min_rating
        return r
위의 코드에서
- dropout layer는 주어진 확률 parameter에 따라 activations을 떨어뜨리는 것이다. overfitting을 줄이기위해 랜덤으로 특정 액티베이션이 파라미터 업데이트에 참여하지 못하도록 하는 것이다.
- embedding layer는 unique 사용자들과 unique 영화들에 해당하는 embedding을 위해 lookup table을 만드는 것이다. back-propagation의 과정에서 값이 업데이트 된다. 이 부분은 좀 더 알아봐야 할 듯..
- linear는 bias를 추가하여 linear matrix multiplication을 하는 레이어다.
- relu는 relu function(f(x) = max(0,x)) 를 이용하여 non linearity를 추가하는 레이어다.
- sigmoid는 training data로부터 계산한 최소값과 최대값 사이의 평가값들을 제한하기 위함이다.(0부터 1사이의 값으로)
이제 정의한 함수에 값을 넣어보자!
Step3 >
# n_users: count unique users (671), n_movies: count unique movies (9066)
model = EmbeddingNet(n_users, n_movies)

# model.parameters() for back-propagation of weights
# lr = 1e-3, weight decay = 1e-5 and using adam optimizer
opt = optim.Adam(model.parameters(), 1e-3, weight_decay=1e-5)

# fitting model,
fit(model, data, 3, opt, F.mse_loss)

# learning rate annealing (for more, check links at the end)
set_lrs(opt, 1e-3)
fit(model, data, 3, opt, F.mse_loss)
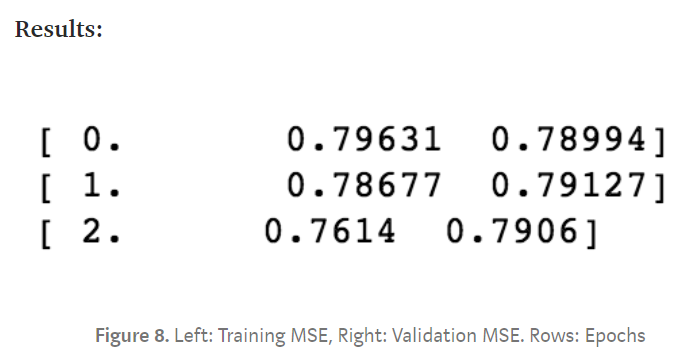
위에서 정의한 클래스 EmbeddingNet을 이용하여 model를 만들어보았다.
( Weight decay 참고 내용 )

이렇게 다양한 메모리 기반의 CF방식에 대해 알아보았다.
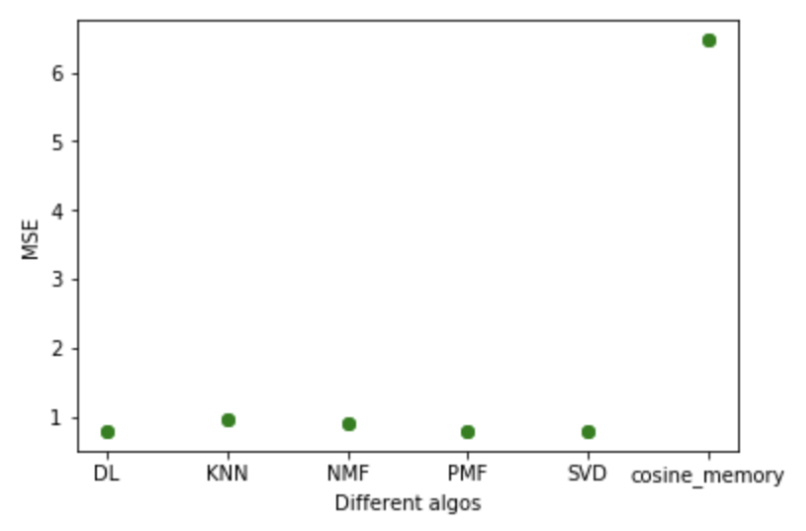
다양한 CF의 결과들을 비교해보면,

Neural net(DL)과 SVD가 좋은 결과를 내는 것을 확인할 수 있다.
피드백은 언제나 환영입니다:)
'개발 > Recommender System' 카테고리의 다른 글
| Embeddings에 대한 이해 -1 | 이미지 기반 유사도, 텍스트 기반 유사도에 대해 (2) | 2020.08.10 |
|---|---|
| Amazon Reviews를 이용한 추천시스템 실습 - surprise패키지 사용 (0) | 2020.07.29 |
| 추천시스템 Recommender System 정리 (0) | 2020.05.26 |
| 추천시스템 Collaborative Filtering(CF) Python 기반 [4] (0) | 2020.05.08 |
| 추천시스템 Collaborative Filtering(CF) Python 기반 [3] (0) | 2020.05.08 |


댓글